Workspaces
What are workspaces?
Workspaces contain the actual Terraform deployments and allow the planning, applying, or destroying of infrastructure defined by a Terraform module. In addition, workspaces provide access to a list of runs and their details (logs) among other things like Terraform and environment variables.
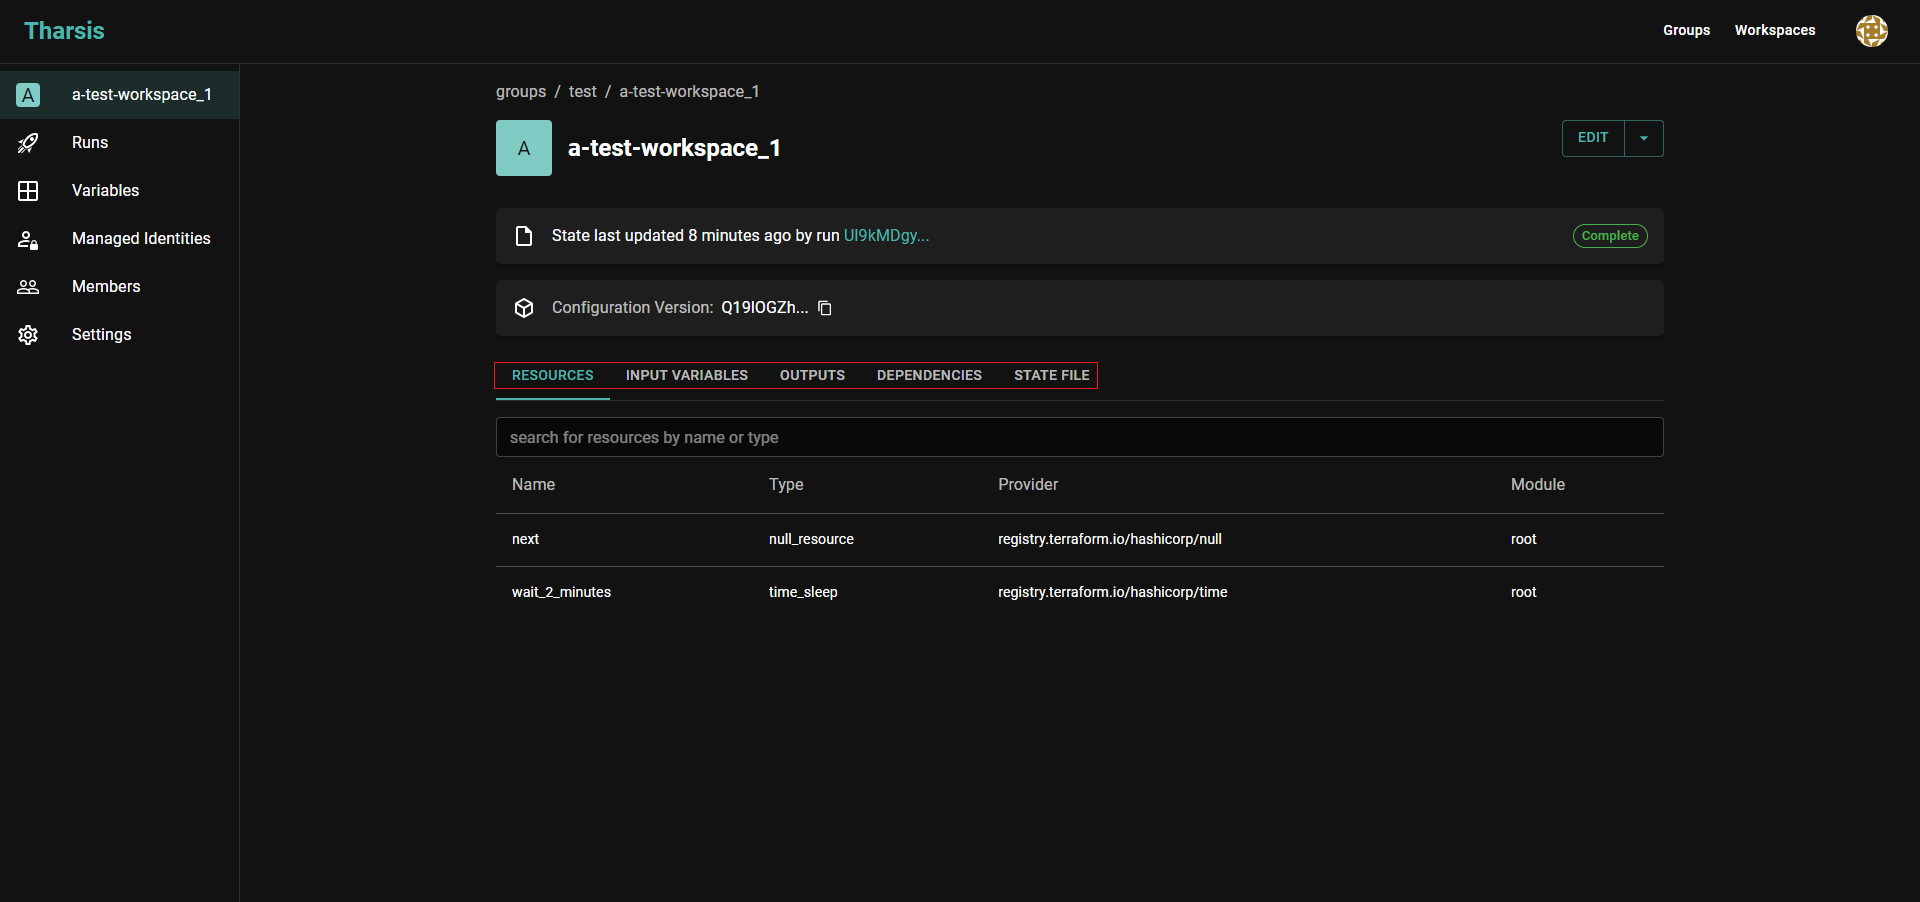
Tharsis UI's workspace details page provides access to the deployed resources, input variables, outputs, dependencies, and state file for a given deployment.
Learn more.
Workspaces can share outputs with other workspaces using the Tharsis Terraform Provider. Control who can read outputs with workspace output visibility.
What are workspace labels?
Workspace labels are key-value pairs that you can attach to workspaces to organize, categorize, and manage them more effectively. Labels provide flexible metadata that helps you identify and group workspaces based on your organizational needs.
Why use workspace labels?
Labels offer several benefits for workspace management:
- Environment Organization: Distinguish between production, staging, and development workspaces
- Team Ownership: Identify which team or individual owns or manages a workspace
- Cost Allocation: Track and allocate infrastructure costs by project, department, or cost center
- Compliance Tracking: Mark workspaces that require specific compliance standards (PCI, HIPAA, etc.)
- Application Metadata: Tag workspaces with application names, versions, or components
Labels are optional but highly recommended for organizations managing multiple workspaces. They make it easier to understand workspace purpose at a glance and enable better organization as your infrastructure grows.
Check the FAQ to see if there's already an answer.
Create a workspace
Workspaces can be created directly via the Tharsis UI or the Tharsis-CLI.
-
From the group details page, click
NEW WORKSPACE: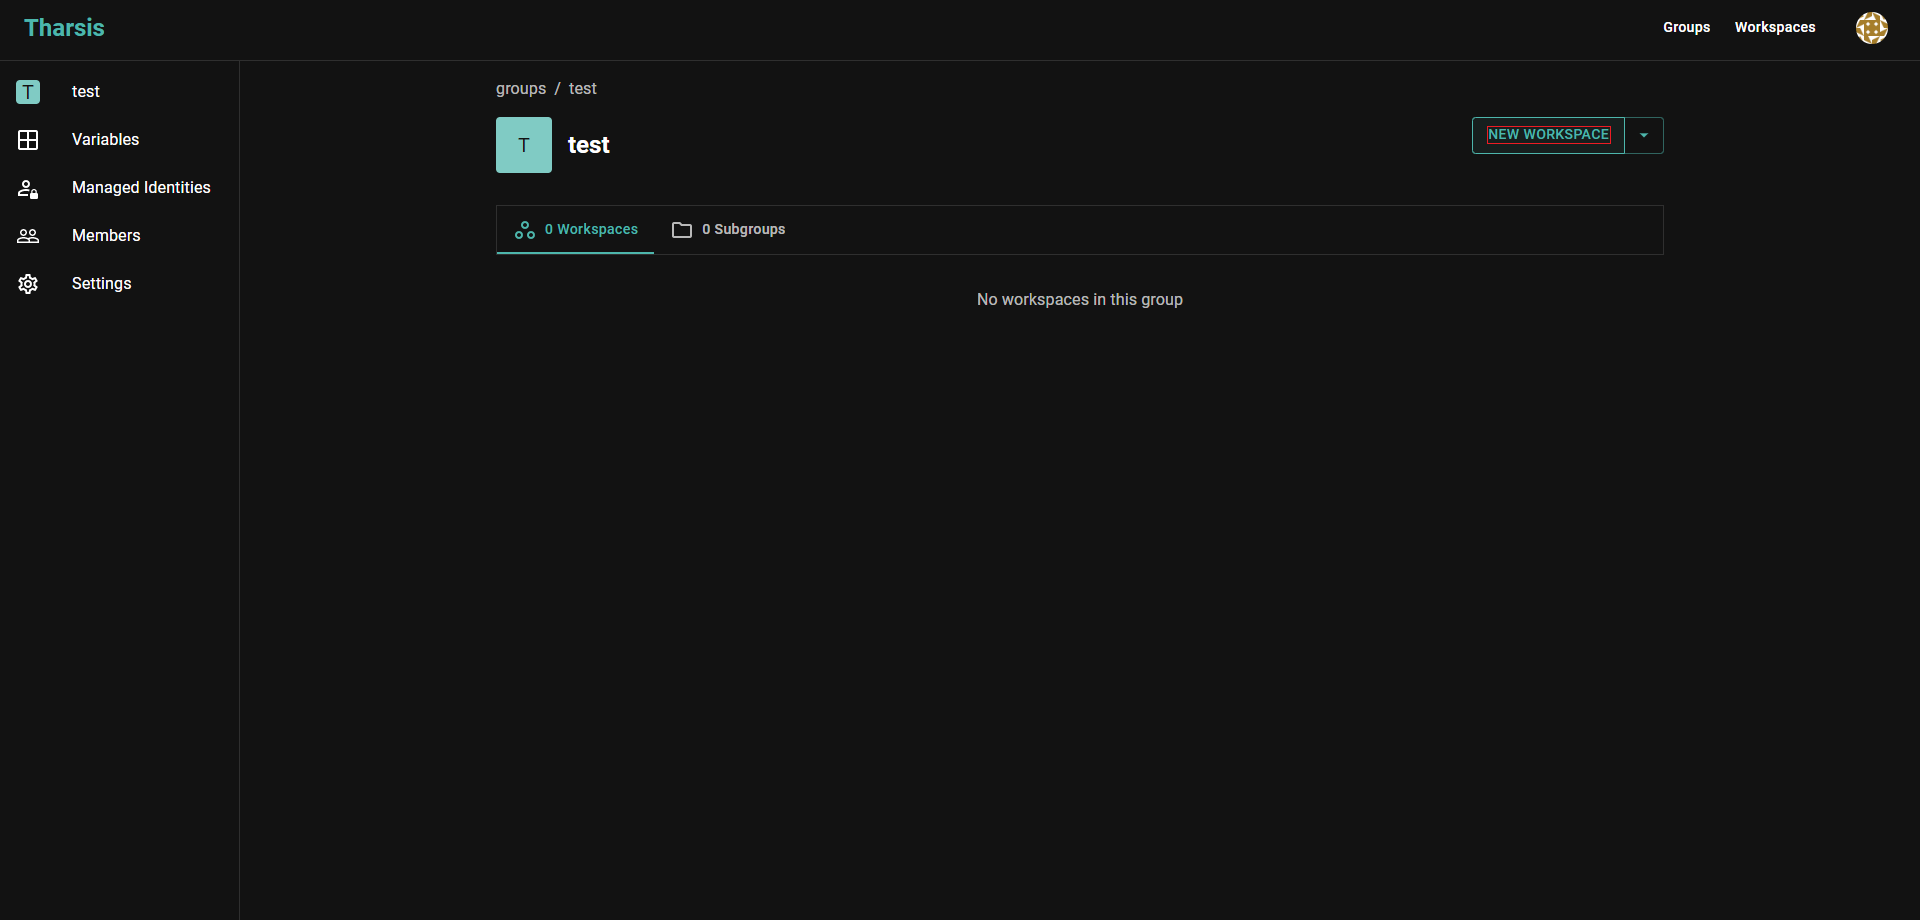
-
Provide the workspace name, optionally a short memorable description, and click
CREATE WORKSPACE: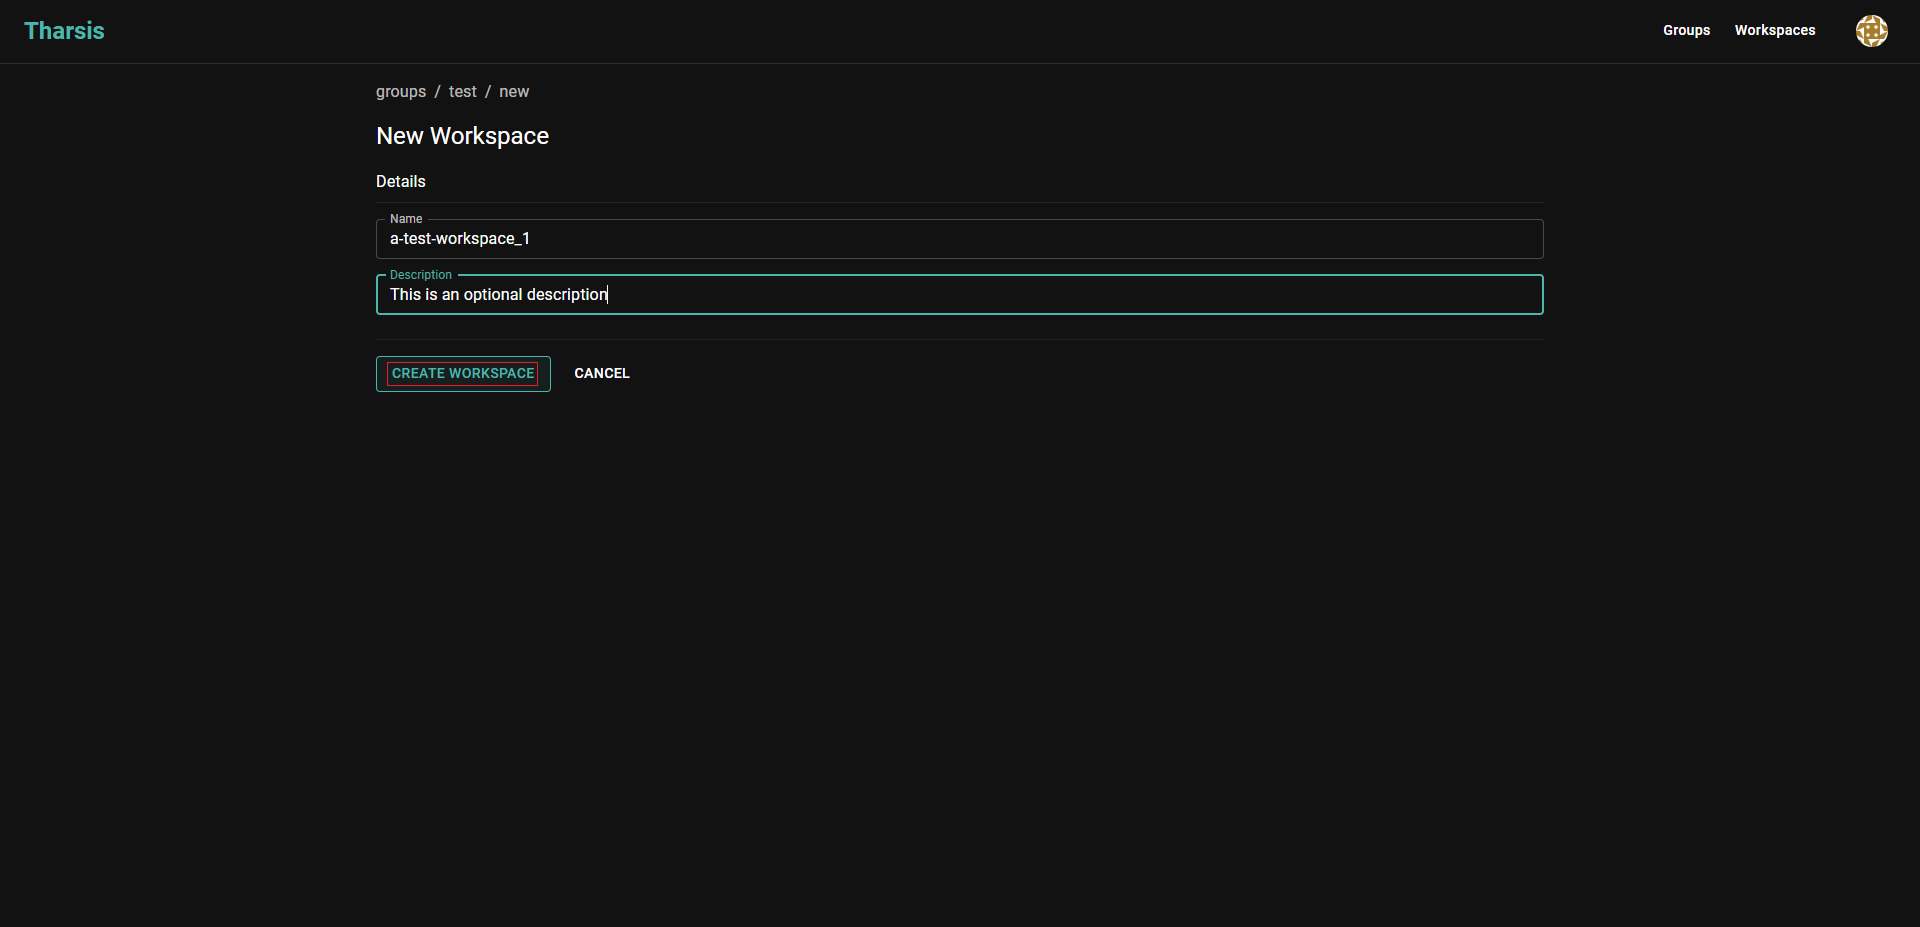 caution
Workspace names may only contain digits, lowercase letters with a hyphen or an underscore in non-leading or trailing positions.
A workspace's name cannot be changed once created. It will have to be deleted and recreated which is dangerous.
Update a workspace
-
From the workspace details page, click
EDIT: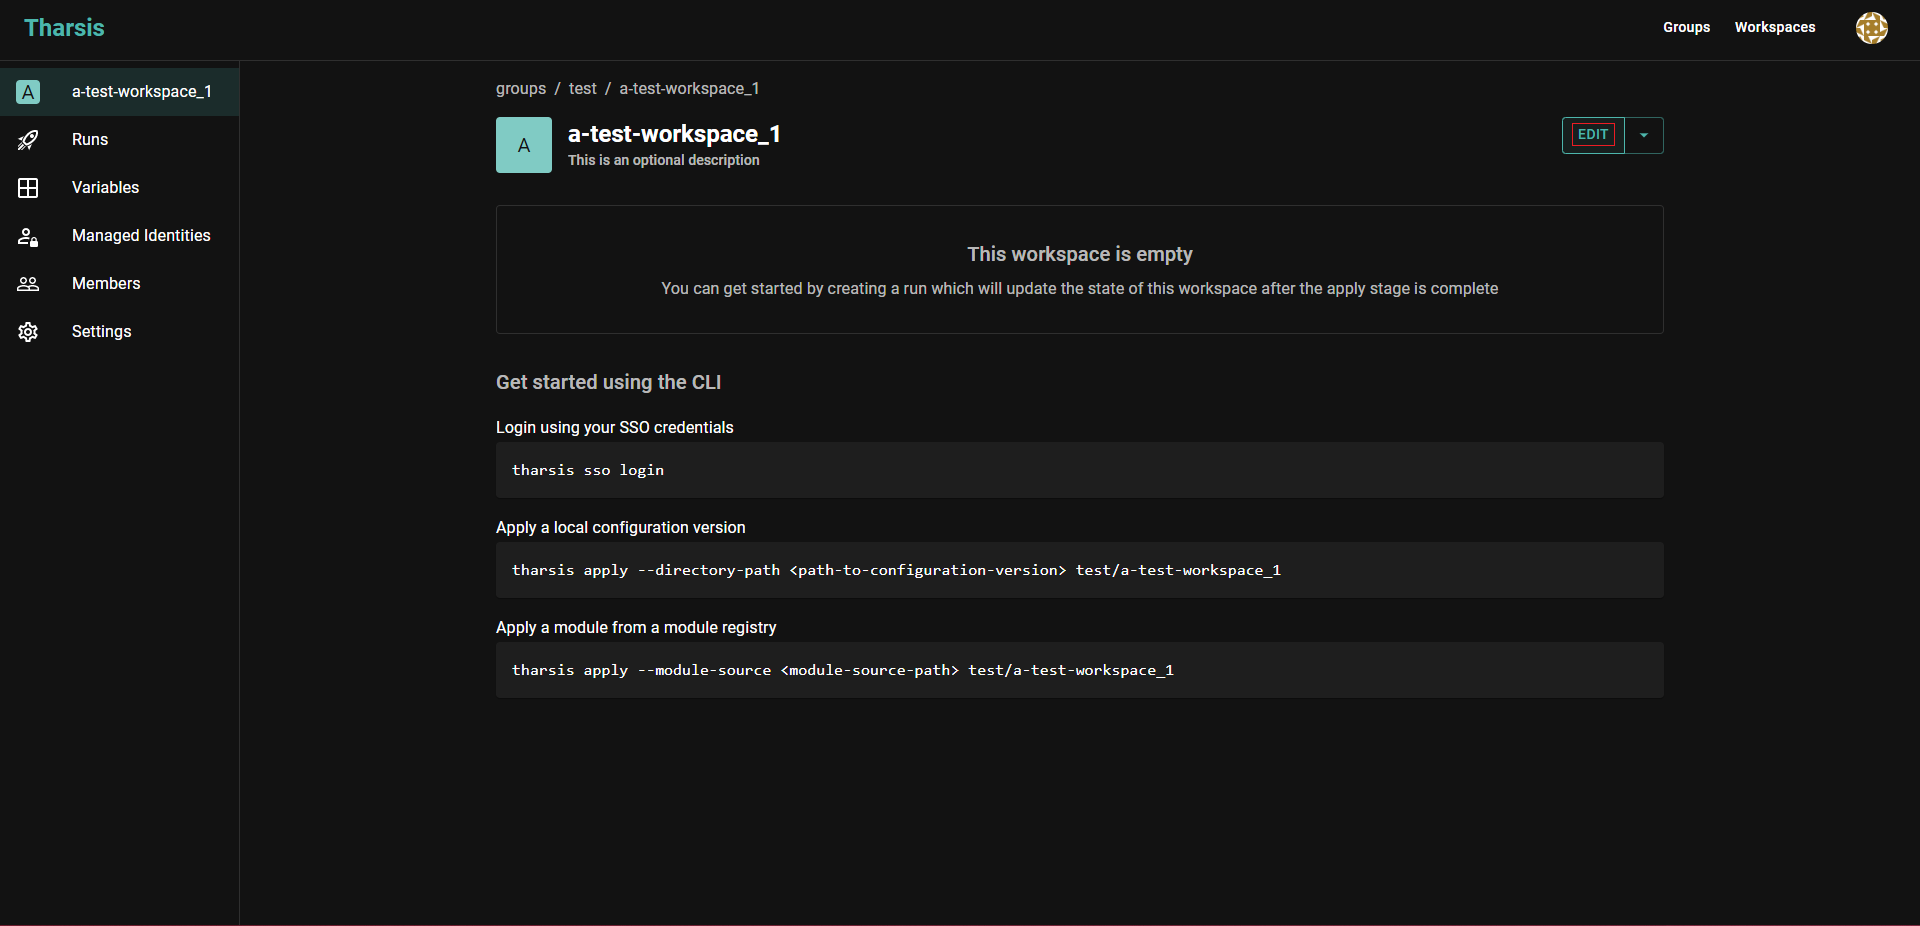
-
Provide a new workspace description (can be empty) and click
UPDATE WORKSPACE: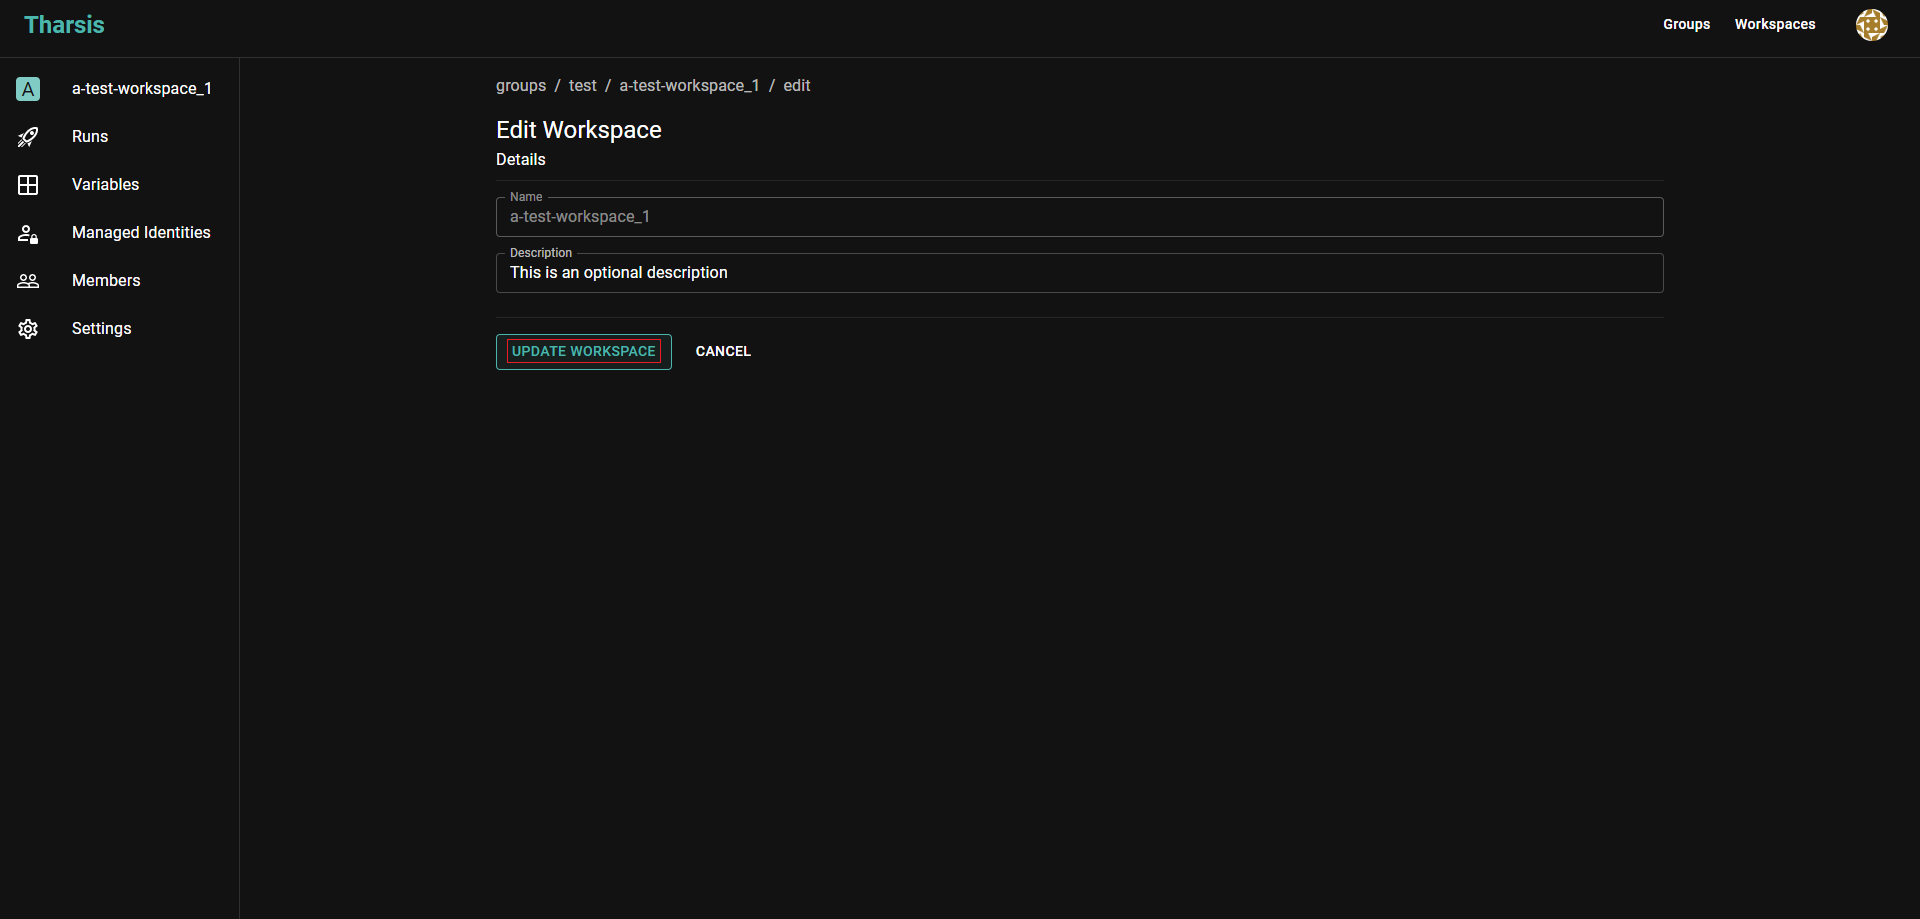
Managing Workspace Labels
Workspace labels can be managed through the Tharsis UI or CLI. You can add labels when creating a workspace or manage them on existing workspaces.
Adding labels during workspace creation
Labels are optional but can be added during workspace creation to help organize and categorize your workspaces from the start.
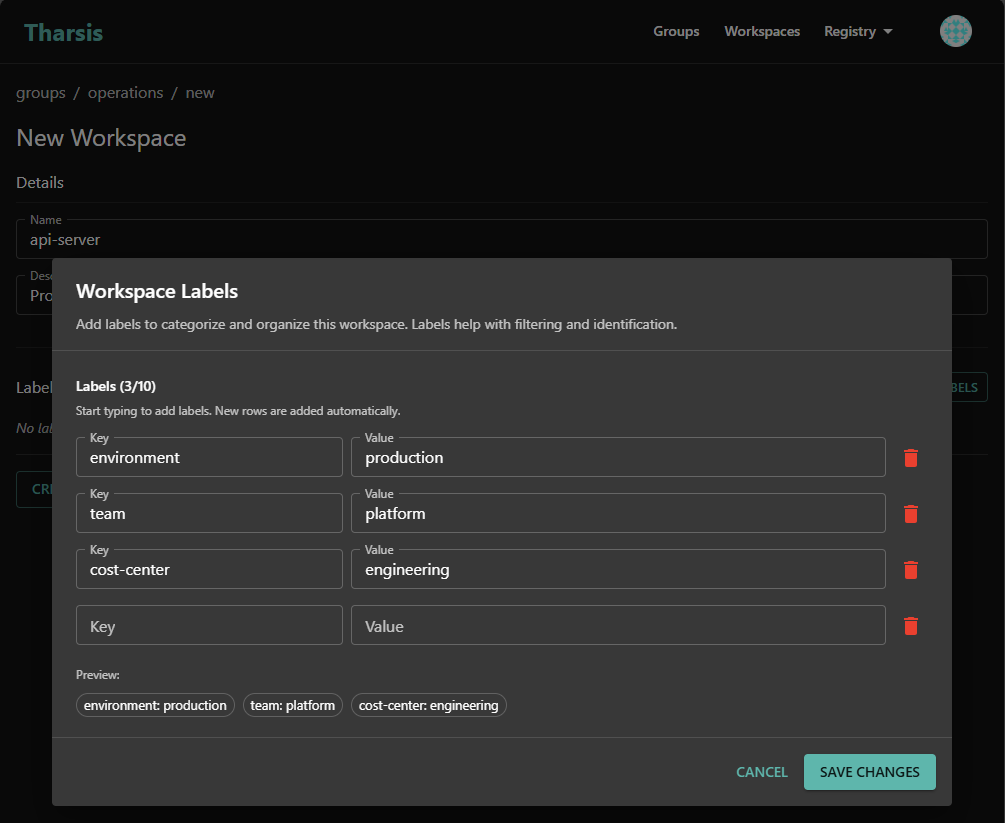
To add labels when creating a workspace:
-
In the create workspace form, locate the Labels section below the description field
-
Click the
MANAGE LABELSbutton -
Enter your label in the label input fields:
- Key: The label identifier (e.g.,
environment,team,cost-center) - Value: The label data (e.g.,
production,platform,engineering)
- Key: The label identifier (e.g.,
-
Review your labels in the list below the input field. You can remove any label by clicking the delete icon next to it
-
Click the
SAVE CHANGESbutton to add the label(s) to the workspace -
Click
CREATE WORKSPACEto create the workspace with the specified labels
Example: Creating a workspace with labels
When creating a production API workspace, you might add these labels:
environment=productionteam=platformapp=api-servercost-center=engineering
Labels are completely optional during workspace creation. You can create a workspace without any labels and add them later. However, adding labels during creation helps establish good organizational practices from the start.
Modifying labels on an existing workspace
To modify labels on a workspace that already exists:
-
From the workspace details page, click
Settingsto open the workspace settings -
In the Labels section, locate and click the
MANAGE LABELSbutton -
Enter your new label in the form:
- Key: The label identifier (e.g.,
team,cost-center,version) - Value: The label data (e.g.,
platform,engineering,v2-1-0)
- Key: The label identifier (e.g.,
-
Review your labels in the list below the input field. You can remove any label by clicking the delete icon next to it
-
Click the
SAVE CHANGESbutton to modify the label(s) for the workspace
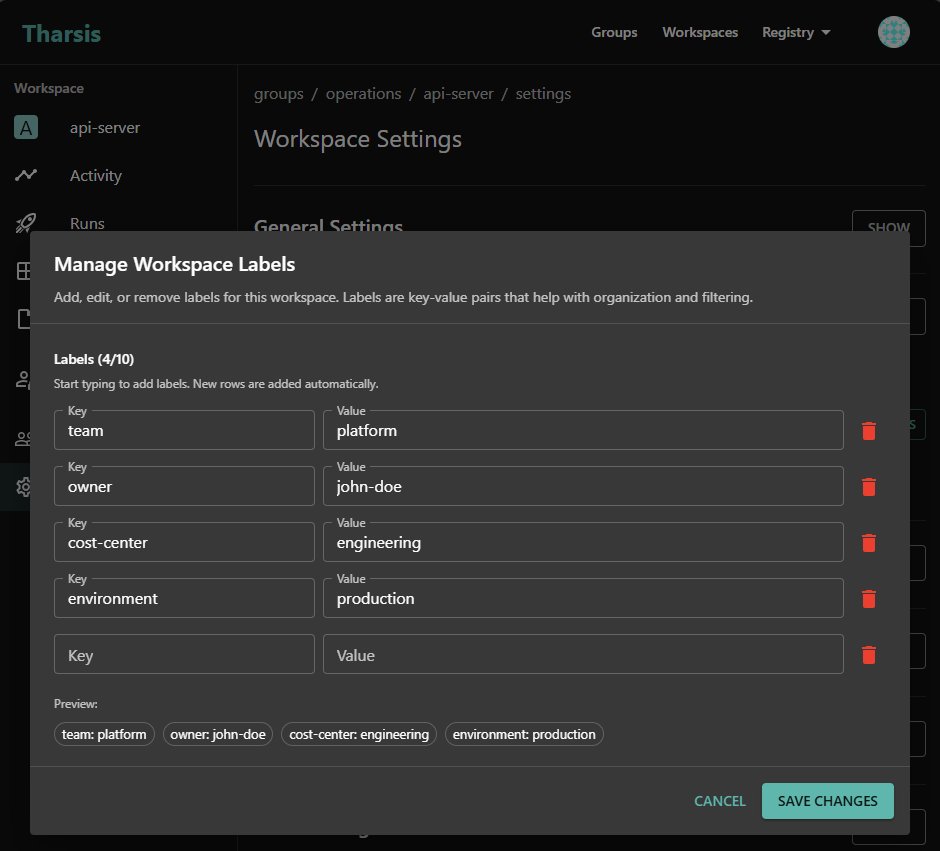
Example: Adding labels to an existing workspace
If you have a workspace that was created without labels, you might add:
environment=productionto indicate it's a production workspaceteam=platformto show ownershipcost-center=engineeringfor cost tracking
Example: Updating a label value
To change an environment label from staging to production:
- Remove the existing label:
environment=staging - Add the updated label:
environment=production
When you update a label value through the UI, you're replacing the old value with a new one for the same key. The workspace will only have one value per label key. If you need to track multiple values, consider using different label keys (e.g., primary-team and secondary-team).
Example: Removing obsolete labels
If a workspace is no longer part of a specific project, you might remove:
project=customer-migration(project completed)temporary=true(no longer temporary)
You can remove all labels from a workspace if needed. Simply delete each label and update the workspace. The workspace will function normally without any labels, though you may lose organizational benefits that labels provide.
- Review labels regularly: Periodically review workspace labels to ensure they remain accurate and relevant
- Update labels when roles change: If workspace ownership or purpose changes, update labels accordingly
- Remove obsolete labels: Clean up labels that no longer apply to avoid confusion
- Use consistent values: When updating labels across multiple workspaces, use consistent values (e.g., always use
productioninstead of mixingprod,production, andprd)
The UI will only validate whether any field is empty or if there are duplicate keys. The label constraints will be validated in the API before allowing you to add them.
Remember that you can add up to 10 labels per workspace. See Workspace Label Constraints for detailed information about label formatting rules and limitations.
Alternative methods for managing labels
- CLI: Use the
tharsis workspace create -labelcommand to add labels during creation. See CLI workspace create documentation - CLI: Use the
tharsis workspace labelcommand for incremental label updates. See CLI workspace label documentation
Viewing existing labels
To view the current labels on a workspace:
-
From the workspace details page, click
Settingsto open the workspace settings -
Scroll to the Labels section and click
SHOWto see all labels currently attached to the workspace -
Each label is displayed in the format
key:value
If the workspace has no labels, the labels section will be empty.
Workspace Label Constraints
When working with workspace labels, you must follow specific formatting rules and limitations to ensure valid label creation. Understanding these constraints will help you avoid validation errors and create labels that work correctly across all Tharsis interfaces.
Label Key Requirements
Label keys must adhere to the following rules:
- Character Set: Only lowercase letters (a-z), numbers (0-9), hyphens (-), and underscores (_) are allowed
- Position Rules: Keys cannot start or end with a hyphen or underscore
- Length Limit: Maximum of 64 characters
- Empty Keys: Keys cannot be empty
Valid label key examples:
environment
env-type
cost-center
team-name
app123
data-classification
owner
Invalid label key examples:
Environment          ❌ Uppercase letters not allowed
-environment         ❌ Cannot start with hyphen
environment-         ❌ Cannot end with hyphen
_team                ❌ Cannot start with underscore
team_                ❌ Cannot end with underscore
env:type             ❌ Colons not allowed
cost.center          ❌ Periods not allowed
Label Value Requirements
Label values have more flexible formatting rules:
- Character Set: Alphanumeric characters (a-z, A-Z, 0-9), hyphens (-), underscores (_), and spaces are allowed
- Length Limit: Maximum of 255 characters
- Empty Values: Values cannot be empty
Valid label value examples:
production
Production Environment
staging-v2
team_platform
Engineering Dept
v2-1-0
PCI-DSS
Invalid label value examples:
prod@aws             ❌ @ symbol not allowed
env:production       ❌ Colons not allowed
team/platform        ❌ Forward slashes not allowed
cost.center          ❌ Periods not allowed
                     ❌ Empty values not allowed
Workspace Label Limits
Each workspace has a maximum limit on the number of labels:
- Maximum Labels: 10 labels per workspace
- No Duplicates: Each label key must be unique within a workspace
If you reach the 10-label limit, consider consolidating labels or using more general categorization. For example, instead of separate labels for app-name, app-version, and app-component, you might use app=api-server, version=v2-1-0, and component=backend.
Common Validation Errors
Here are the most common validation errors and how to fix them:
Invalid label key format:
This error occurs when a label key doesn't meet the formatting requirements. Common causes include:
- Using uppercase letters in the key
- Including special characters
- Starting or ending with a hyphen or underscore
- Exceeding the 64-character limit
Fix: Use only lowercase letters, numbers, hyphens, and underscores. Ensure hyphens and underscores are not at the beginning or end of the key.
Invalid label value format:
This error occurs when a label value contains characters outside the allowed set.
Fix: Remove special characters like @, :, /, or . from the value. Use only letters, numbers, hyphens, underscores, and spaces.
Too many labels:
This error occurs when you attempt to add more than 10 labels to a workspace.
Fix: Remove unnecessary labels or consolidate related labels into more general categories to stay within the 10-label limit.
Empty key or value:
This error occurs when a label key or value is empty.
Fix: Ensure both key and value are provided in the key=value format with non-empty strings for both parts.
Label key or value too long:
This error occurs when a label key exceeds 64 characters or a value exceeds 255 characters.
Fix: Shorten the key or value to fit within the character limits. Use abbreviations or shorter descriptions where possible.
- Use consistent naming conventions across your organization (e.g., always use
environmentinstead of mixingenv,environment, andstage) - Keep keys short and descriptive (e.g.,
teaminstead ofteam-name-identifier) - Use hyphens for multi-word keys (e.g.,
cost-centerinstead ofcost_center) for better readability - Document your organization's label standards to ensure consistency across teams
Workspace output visibility
Workspace output visibility controls which workspaces can read another workspace's outputs. It lets you restrict or widen access depending on your organization's needs — from blocking all access to sharing outputs with any workspace in Tharsis.
Check the FAQ for common questions about output visibility.
A workspace can always read its own outputs, regardless of the visibility setting.
Visibility options
| Option | Who can read outputs |
|---|---|
| Block access | No other workspace can read outputs. |
| Workspaces in this group | Only workspaces in the same immediate parent group. |
| Workspaces in this group or child groups | Workspaces in the same group as this workspace, or in any of that group's subgroups. |
| Any workspace in root group | Any workspace that shares the same top-level (root) group. |
| Any workspace in Tharsis | Any workspace in the entire Tharsis instance. |
Workspace outputs can contain sensitive infrastructure values. Reserve Any workspace in Tharsis for shared-services workspaces whose outputs are meant to be available instance-wide.
Inheritance
Output visibility is set at the group level and inherited by all child groups and workspaces in the hierarchy. A child group or workspace can override the inherited value with its own setting.
The response from the API always tells you the current effective value and which group it was inherited from.
Configuring output visibility on a group
- Navigate to the group's Settings page.
- Find the Output Visibility Settings section (between Provider Mirror and Advanced Settings).
- If this is not a root group, uncheck Inherit from parent group to set a group-specific value.
- Select a visibility level from the dropdown.
- Click Save.
Root groups do not show the "Inherit from parent group" checkbox since there is no parent to inherit from.
Child groups and workspaces that inherit from this group reflect the new value on their next read.
Configuring output visibility on a workspace
- Navigate to the workspace's Settings page.
- Find the Output Visibility Settings section (between Provider Mirror and State Settings).
- Uncheck Inherit from parent group to set a workspace-specific value.
- Select a visibility level from the dropdown.
- Click Save.
Viewing the inherited value
When a workspace or child group inherits its visibility setting, a chip displays the current value and which group it comes from. This makes it easy to trace where the setting originates without navigating up the hierarchy.
Referencing outputs from another workspace
Use the tharsis_workspace_outputs or tharsis_workspace_outputs_json data source to read outputs from another workspace. See Retrieving workspace outputs for the full syntax and attribute reference.
When access is denied (the visibility setting does not allow the requesting workspace to read outputs), Terraform will return an authorization error during the plan or apply stage.
Example scenarios
- Block all access — Set visibility to "Block access" on a workspace that produces sensitive outputs that should not be consumed by other workspaces.
- Restrict to same group only — Set visibility to "Workspaces in this group" on a group that contains sensitive infrastructure workspaces. Only sibling workspaces in the same group can read their outputs.
- Share across a group and its children — Set visibility to "Workspaces in this group or child groups" on a parent group. Workspaces in that group and all of its subgroups can share outputs freely.
- Share within the root group hierarchy — Set visibility to "Any workspace in root group" on a group that provides shared networking or platform outputs. Any workspace under the same root group can read them, but workspaces in other root groups cannot.
- Make outputs available to all workspaces — Set visibility to "Any workspace in Tharsis" on a shared-services group. Any workspace anywhere in Tharsis can read those outputs.
Advanced Settings
Migrate a workspace
-
From the workspace settings page, click the
MIGRATE WORKSPACEbutton: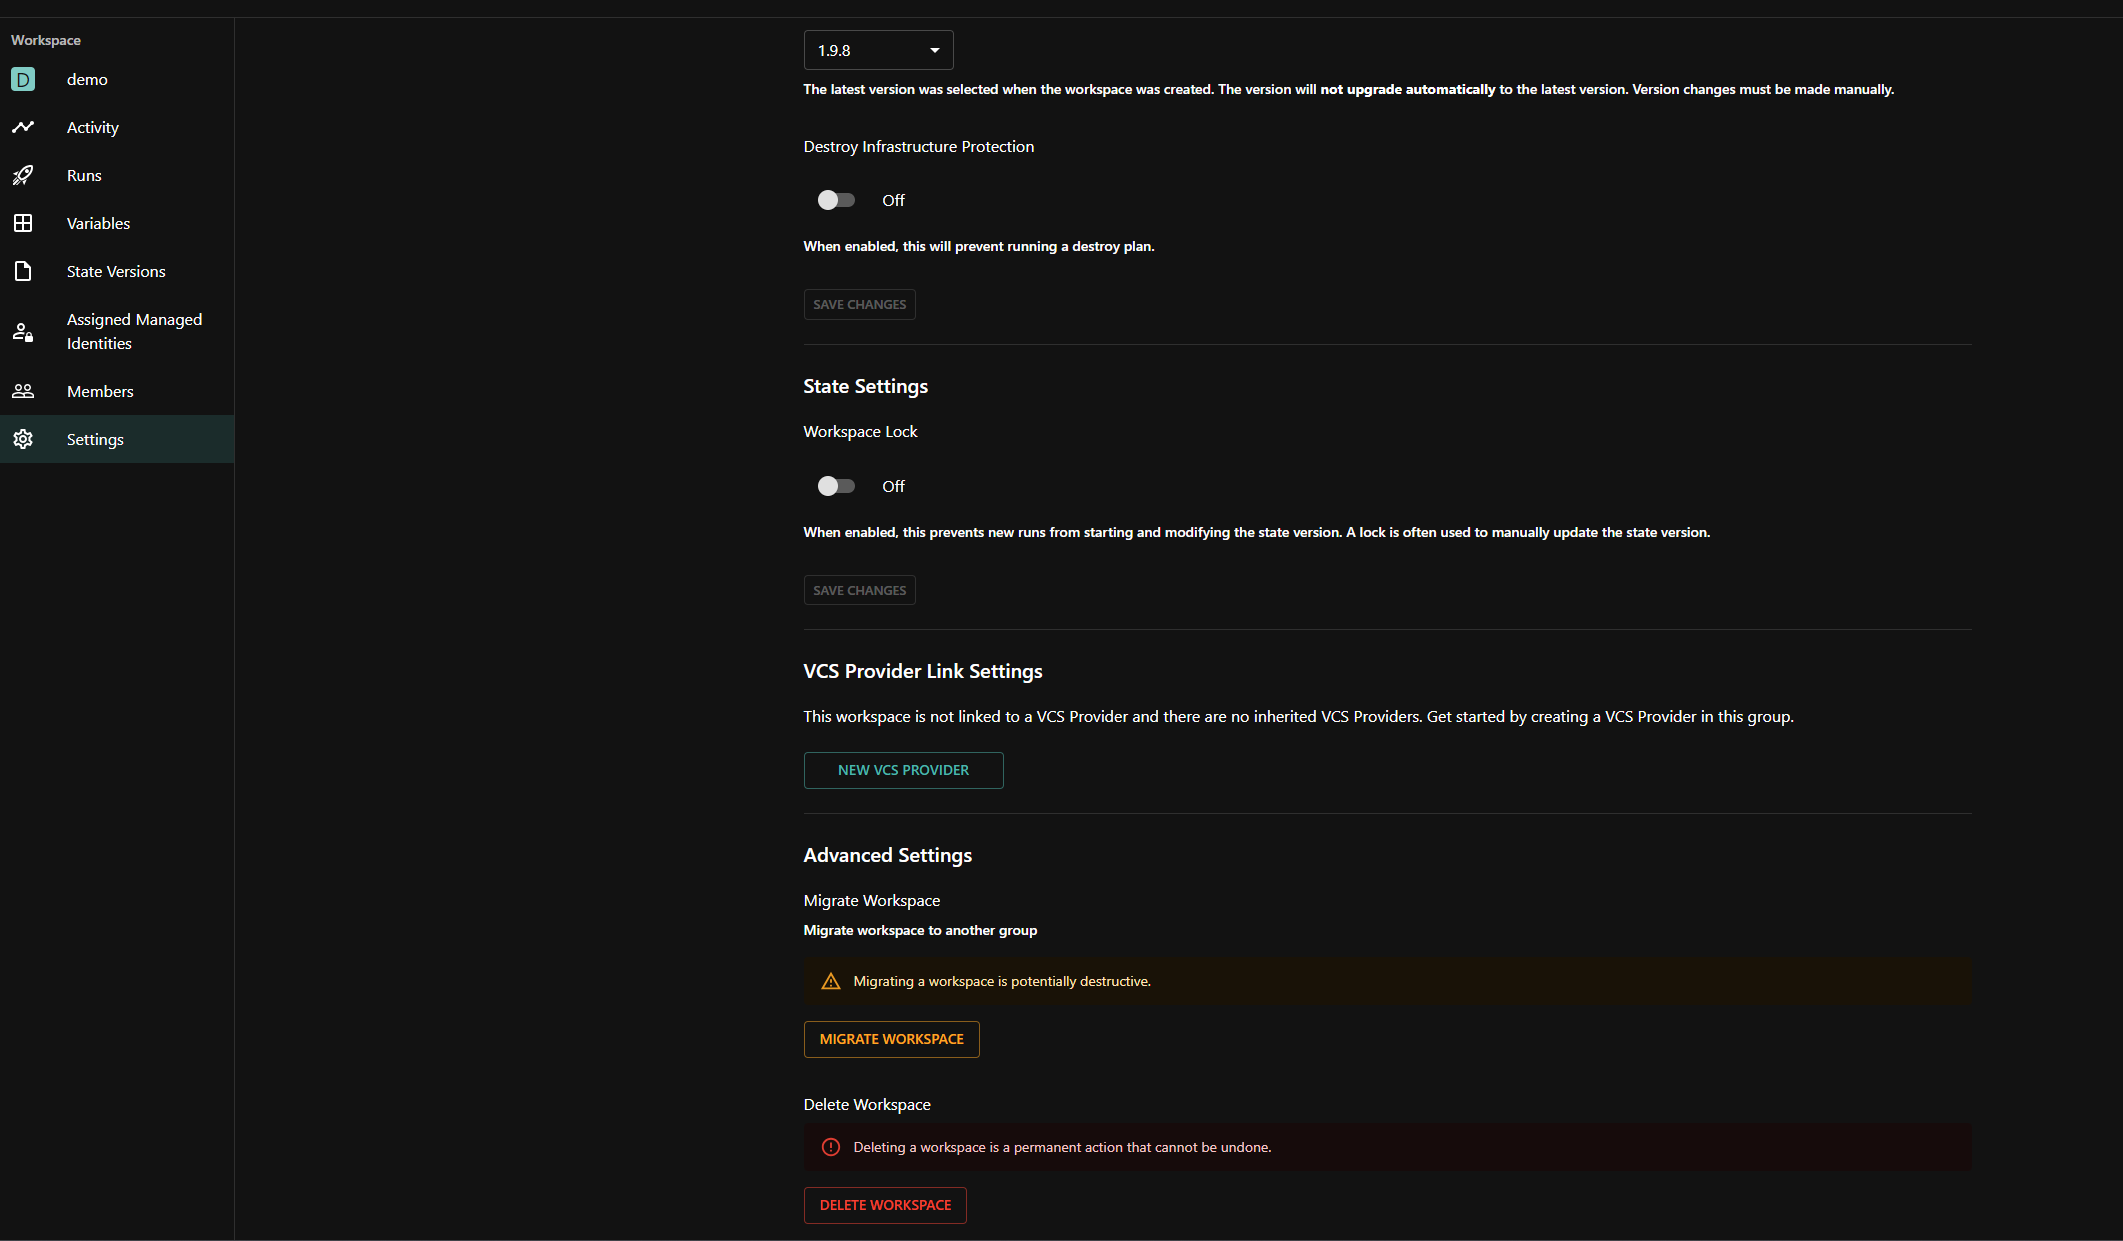
-
Select the new parent group and then click
MIGRATE: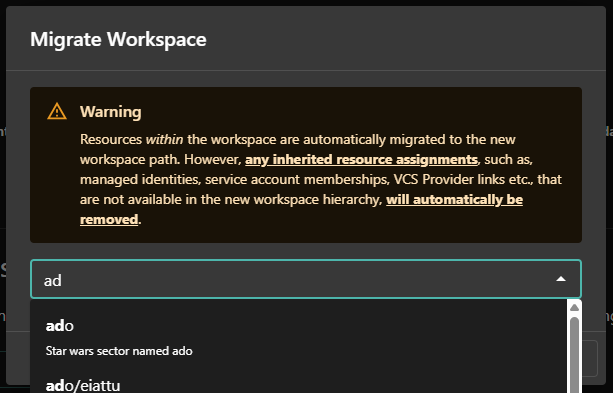
To migrate a workspace, the user must have permissions to create workspaces in the new group hierarchy and delete the workspace from the current group. Without these permissions, the migration will fail.
Migrating a workspace will remove any inherited resource assignments (e.g., managed identities, service account memberships, VCS provider links) that are not available in the new group hierarchy. This may result in a failed deployment if not reconfigured. However, resources within the workspace, such as variables, outputs, and state files, will remain intact.
Delete a workspace
-
From the workspace settings page, click the
DELETE WORKSPACEbutton: -
Enter the workspace path to confirm deleting and then click
DELETE: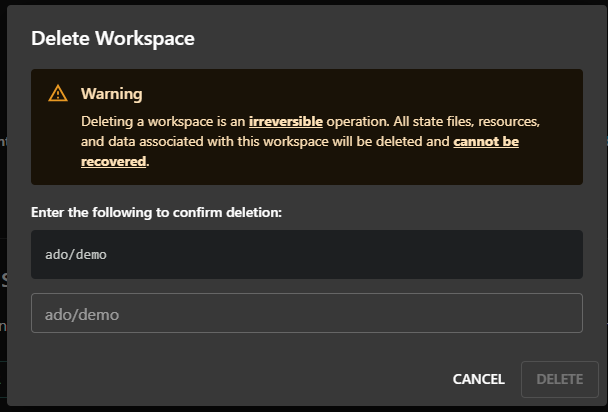
Deleting a workspace is an irreversible operation. All workspace resources such as runs, state files, and outputs will automatically be deleted and cannot be recovered.
Proceed with extreme caution as force deletion permanently removes ALL deployment state files and related information from Tharsis. If unsure, do not proceed.
Frequently asked questions (FAQ)
Who can create / update / delete workspaces?
- A deployer or higher (owner, administrator) can create a workspace.
- Viewer cannot modify a workspace.
- System administrator can create / delete any workspace.
Why can't I delete a workspace?
Either you don't have appropriate privileges, or the workspace has resources deployed and Tharsis prevented an accidental deletion.
I'm confident my Terraform configuration is correct but my runs keep failing. What could be a potential issue?
If your configuration is correct and no other errors are suspected, it could be that you simply forgot to assign a managed identity to your workspace. A deployment to AWS or Azure will fail if no IAM role can be assumed.
How many jobs can simultaneously run on a workspace?
All jobs process in a first in, first out order. A workspace can only have one active job at any given moment.
Where can I find an overview of my deployed resources, outputs, state file, etc.?
Once a run completes its apply stage, the run populates the workspace details page. The user can view deployed resources, input variables, outputs, dependencies, and of course the state file right from the Tharsis UI.
Populated workspace details page
How do I assign a managed identity to a workspace?
See assign a managed identity for the Tharsis UI.
How do I read outputs from a workspace in a different root group?
Choose the least permissive approach that meets your need:
- To give access only to specific workspaces, use a Tharsis managed identity linked to a service account with Viewer access in the target group. This scopes access to that service account. See Tharsis Managed Identity for the full setup.
- For a workspace whose outputs are intentionally shared instance-wide, set the output visibility on the target workspace (or its parent group) to Any workspace in Tharsis. See workspace output visibility for details.
Any workspace in Tharsis is the broadest option. Use it only when the outputs are meant to be read across the whole instance.
Can a workspace always read its own outputs?
Yes. Self-access is always allowed regardless of the visibility setting. A workspace's own runs can always read its outputs.
What happens if I change the visibility setting on a group?
The new setting applies to all child groups and workspaces that inherit from it, taking effect on their next read. A more restrictive setting removes access for workspaces that no longer meet it. A more permissive setting grants access to the wider audience, including the outputs of every child group and workspace that inherits the setting.
What error do I see when output access is denied?
Terraform will return an authorization error during the plan or apply stage. The error indicates that the requesting workspace does not have permission to read the target workspace's outputs.
What are workspace labels and how do I use them?
Workspace labels are key-value pairs that help you organize, categorize, and manage workspaces. They're useful for identifying environments (production, staging), tracking ownership (team, owner), allocating costs (cost-center, project), and marking compliance requirements.
Quick example:
environment=production
team=platform
cost-center=engineering
You can add labels when creating a workspace or manage them later through the workspace edit interface. Labels are completely optional but recommended for organizations managing multiple workspaces.
Learn more:
- What are workspace labels? - Overview and use cases
- Managing workspace labels - UI-based label management
- Workspace Label Constraints - Formatting rules and limits
- CLI Label Management - Command-line label operations
Why am I getting a label validation error?
Label validation errors occur when label keys or values don't meet the required formatting rules. Common issues include:
- Uppercase letters in keys: Label keys must be lowercase only (use
environmentnotEnvironment) - Invalid characters: Keys can only contain lowercase letters, numbers, hyphens, and underscores. Values can also include uppercase letters and spaces
- Leading/trailing hyphens or underscores: Keys cannot start or end with
-or_(useenv-typenot-env-typeorenv-type-) - Special characters: Characters like
@,:,/, or.are not allowed in keys or values - Empty keys or values: Both key and value must have content
- Length limits: Keys are limited to 64 characters, values to 255 characters
Examples of fixing common errors:
❌ Environment=prod     → ✅ environment=prod
❌ -environment         → ✅ environment
❌ env:prod             → ✅ env-prod
❌ team@platform        → ✅ team-platform
Learn more:
- Workspace Label Constraints - Complete formatting rules and common validation errors
- CLI workspace label command - CLI label management
How many labels can I add to a workspace?
Each workspace can have a maximum of 10 labels. Each label key must be unique within the workspace.
If you reach the 10-label limit, consider consolidating labels or using more general categorization. For example:
- Instead of:
app-name=api,app-version=v2,app-component=backend(3 labels) - Use:
app=api-server,version=v2,component=backend(3 labels with more concise keys)
You can also evaluate which labels are most important for your organizational needs and remove less critical ones.
Learn more:
- Workspace Label Constraints - Label limits and rules
What happens to labels when I delete a workspace?
When you delete a workspace, all labels attached to that workspace are permanently deleted along with the workspace itself. Labels cannot be recovered after workspace deletion.
If you need to preserve label information before deleting a workspace:
- Document the labels manually or export them through the CLI or API
- Consider if you need to recreate similar labels on a replacement workspace
- Review any automation or scripts that depend on those labels
Remember that workspace deletion is irreversible and removes all workspace resources including labels, runs, state files, and outputs.
Related documentation:
- Delete a workspace - Workspace deletion process
- CLI workspace commands - Viewing and managing workspaces via CLI